Swift Essentials: Optionals
Swift is designed to be safer than C-based programming languages. For example, Swift is a type safe language, that uses compile-time type checking to help catch errors early in the development process. And Swift uses type inference to enable the compiler to deduce types, requiring far fewer explicit type declarations.
Another language feature that enhances safety is the optional. When you declare an instance in Swift, that instance must have a valid value for its type. If that instance can potentially be nil, then it must be declared as an optional. This enables the compiler to distinguish between required and optional instances, which helps developers reason about the suitable use and proper handling of a nil condition.
Declaring Optionals
In the code below, message1 and message2 are Swift String variables. The variable message1 is declared to be a String explicitly, while message2 uses type inference based upon its assignment to a String literal. Because a String is not optional in Swift, the compiler throws an error if you assign nil.
In the case where it is valid for a String to contain a nil value, that instance must be declared as an optional String. You declare that an instance is optional by following its type with a question mark (e.g. String?, Int?, MyStruct?, MyClass?, etc.). The variable message3 is an optional String, so it can be set to nil without a compiler error.

Unwrapping Optionals
Unlike Objective-C, which only allows objects to be nil, optionals can be used with any type in Swift. You can think of an optional as a container or box around the type. The box can either be empty (nil) or contain an instance of the specified type. If the optional contains an instance, it must be unwrapped to access the instance.
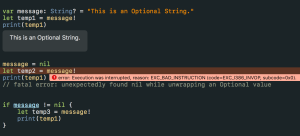
One way to unwrap an optional is to use forced unwrapping. You can force unwrap an optional by appending an exclamation mark to the end of the optional. However, this approach does come with a big risk. If you force unwrap an optional that is nil, the app will crash! It is therefore recommended that you avoid forced unwrapping whenever possible.
In the code below, forced unwrapping is used to unwrap the optional String message. When message contains a String, the optional is unwrapped and assigned to temp1. However, when message is nil, the forced unwrapping causes a runtime trap. To address this, we could do a nil check before we force unwrap an optional. But Swift provides a better alternative called optional binding.
Optional Binding
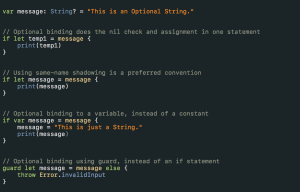
Optional binding is a pattern that is used to detect whether or not an optional contains a value. Using an if, while, or guard statement, optional binding will perform the nil check and extract the unwrapped value into a temporary instance if it is not nil. Optional binding can be done with the let keyword to create a constant, or the var keyword to create a variable.
In the code below, optional binding is used on the optional String message. The first example uses “if let” to bind the value to a temporary constant named temp1. This new constant is a String, and is available within the scope of the if statement. The second example is similar, except it uses same-name shadowing, which creates a non-optional instance with the same name as the optional. Same-name shadowing is a recommended convention that helps with code clarity, and protects against unintentional shadowing of symbols in the parent scope. The third and fourth examples demonstrate optional binding used with a variable and a guard statement.
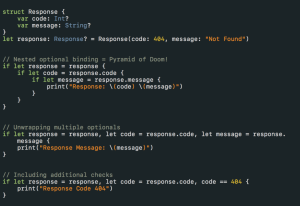
It is often the case that an operation requires the availability of multiple optionals. In this case you could use nested “if let” statements, each one handling a single optional instance. However, nested optional binding can result in code that is so convoluted that it has come to be know as the “Pyramid of Doom”. To address this, Swift supports unwrapping multiple optionals in a single statement.
In this next code sample, we create an optional instance of a custom struct named Response. The struct itself contains two optional instance variables named code and message. The first example uses nested optional binding to conditionally access the instance variables. The second example illustrates how unwrapping multiple optionals accomplishes this in a much cleaner way. The third example demonstrates how you can include additional checks in order to specify more conditions in a concise way.
Optional Chaining
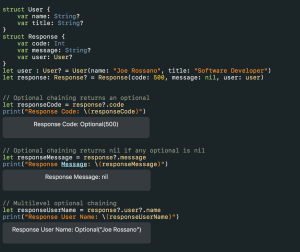
Optional chaining is a mechanism for querying properties and methods on an optional, without unwrapping the optional. Multiple queries can be chained together in a single statement. If any optional in the chain is nil, then the statement will return nil. If none of the optionals in the chain are nil, then the statement will return a non-nil optional. It is important to understand that the result is always an optional, even if the property or method returns a non-optional value.
In the code below, optional chaining is used to query the properties of the Response struct. In the first example, the query returns a response code of 500. Notice that an optional Int is returned, even though the code property of the Response struct is a non-optional Int. In the second example the response instance is non-nil, but because the message property is nil, the query chain returns a nil. The third example shows how multilevel optional chaining can be used to drill down and query properties of optional properties.
What’s Next
This post has covered the basics of using optionals in Swift. There is more to learn though, like using the nil-coalescing operator to assign default values, and initializing classes with implicitly unwrapped optionals. These topics and more can be found online in the Swift Programming Language Guide. You might also want to explore the Swift resources from Apple, and the Swift open-source project.
Note: Code samples were written using Swift 3.0.2 and Xcode 8.2.1.
Posts in the Swift Essentials Blog Series:
- Optionals
- Closures
- Extensions
- Protocols
- Generics

