Git Basics

The information for this blog post was taken from the content of a Git Basics training at EG’s 2020 QA Retreat. The purpose of this training was to provide a baseline for Automated Test Developers.
Often times, automated testers find ourselves performing only a few Git commands. On some projects, we may clone the main project repository but make few commits. On other projects, we may have separate repositories for automated testing code and may be the only user, versus working on a combined code base with a dev-test team. The product of these realities is that we can know to execute common commands, but miss out on what we should really know about the underlying system.
This first post in a short series on Git will focus on working solo – like Chuck Norris in A Force of One. We’ll cover using Git on a small team (and a remote repository) in a later post.
How did we get here?
I love to start with a short history. This gives me a context and a sense of why certain tools were developed. I found a short dive into version control pretty interesting.
| System | Created | Notable Features |
| Source Code Control System (SCCS) | 1972 | Free with Unix, stored original doc + set of incremental changes |
| Revision Control System (RCS) | 1982 | Open source, stored latest version, and sets of changes in reverse |
| Concurrent Version System (CVS) | 1986 | Multiple files and multiple users per repository |
| Apache Subversion (SVN) | 2000 | Open source, track text changes, and images tracked history of directories |
| BitKeeper | 2000 | One of the first distributed code repositories. Used to distribute Linux prior to Git |
| Git | 2005 | Open-source distributed version control system |
When Linux was originally being distributed by BitKeeper in early 2000 they maintained a free community edition. In 2005 BitKeeper discontinued their community addition and Linus Torvalds wrote Git that year giving the community its first open-source distributed version control system.
Since that time Git has flourished. The most common public repo GitHub had 50,000 repositories and 100,000 users in 2009. In three years, that bumped to 2,000,000 repositories and 1,000,000 users. In 2018 GitHub was purchased by Microsoft, but with their newfound commitment to open-source GitHub boasted over 57,000,000 repositories and 28,000,000 users in 2019.
What do we mean by Distributed Version Control?
When we talk about “distributed version control” we mean primarily these things:
- No central repository is required
- Different users maintain their own repositories
- Track changes, not versions
- Changesets can be exchanged between repositories
- “Merge in changesets” or “apply patches”
How do I get Git?
If you are using Mac or Linux you may want to start with Homebrew. Homebrew boasts itself as “The Missing Package Manager for macOS (or Linux).” I have found that it does not disappoint.
Install Homebrew
You need to first install Homebrew itself.
Install Git
Then you can use Homebrew to install the git package locally.
Setting git up with Homebrew is just that easy. You are now up and running! (Alternatively, you can download and install from the main Git website.)
The next thing you will want to do is understand and set up some system configuration.
System Configuration
Git offers three levels of configuration options. The first is System, which is global to the entire system. User configurations are for the particular logged-in user. Finally, Project configurations are set only for the particular project you are working in.
In order to see what configurations you currently have set at each level, try these commands one at a time.
Now let’s set a few configurations. First, set your user.name and user.email:
My current favorite editor is VS Code so let’s set that as our default editor. This will become important later when we add good comments to our check-ins.
Git’s File Lifecycle
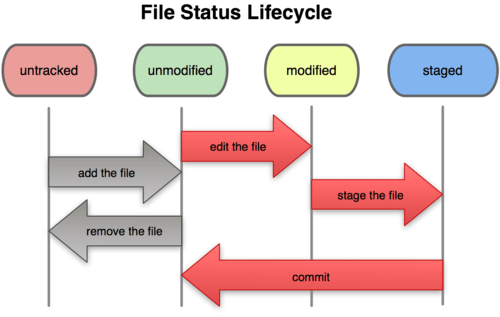
You will find yourself using the command git status a lot to confirm your understanding of this graphic, but a thorough understanding is required to effectively use Git. Many new user mistakes are caused by a mistaken understanding of where a file exists in this lifecycle.

Staging
Untracked files are unknown to Git. The add command will tell Git you care about a file and to start tracking changes on that file.
If you have several files you want to stage, you can use the following command to stage all un-staged files in the current directory.
Committing
Once you have added files to the staging process, with git add, you can commit the staged files as one block with a message.
Your message should be descriptive and explain what changes your commit makes to your code.
This commit will create a new node in the repository data structure that we can refer to later. In order to see previous commits, you can use the log command:
Undoing Things
If you’d like to change your most recent commit (for example, you forgot the commit message or you forgot to add a file), then you can use the following commands.
If you’d like to unstage a file that you accidentally staged, use this:
This will take the file off the staging area but will leave your modifications intact.
This next command is useful if you would like to actually undo your work. If you’d like to revert your file to its state at the time of the last commit, then use the following:
Branching
Branches are separations in your codebase similar to branches of a tree. You can branch off of any other branch. The tree analogy breaks down a little with the fact that you can merge back into any other branch. You can create a new branch by issuing the following command:
The following command lets you switch to a branch:
After you’ve made all of your changes in your branch and confirmed all’s working well, you will want to merge that branch back into the master branch.
Working Example
The last section of this post is essentially a “script” that you can follow, to perform some basic actions and see the effects of the changes as you work with files and directories within Git’s file lifecycle.
Open a terminal window and navigate to where you want to put your work.
Create a new directory called GitBasics and change into that dir. Then tell git to initialize that new directory for use with a local repository.
Now, take a look at the status. You should see that you’re on the master branch, and that there are no commits.
Ok – you have a clean slate. Let’s fix that by adding a file!
Check your git status again.
Git should tell you that you now have an untracked file. That’s what we want!
Now it’s time to “stage” or “add” your new file.
Check your git status again.
Git will tell you that there’s a new file it’s tracking, but that there are no commits yet.
Commit the file with a message of your choice.
There, you’ve added your first file for tracking and committed that file to the local repository.
Now, open your hello file in an editor and make a change. Then check the status again.
Since git is now tracking this file, it knows that you’ve modified it. Since you’ve modified it, you need to add the changed file again:
Check git status again to confirm the file is staged for committing.
Now let’s “unstage” that file:
Check your git status again to see the file’s modified but unstaged:
Now, back out of your recent changes since the last commit:
Check the status again, and open your file in an editor to confirm your recent changes are gone.
Check the status again, and open your file in an editor to confirm your recent changes are gone.
Check status. Then add both files for tracking, check the status again.
Delete one of the files and check the status:
Git knows that you removed the file from the folder, but lets you know that it’s still tracking that file. So we need to tell git to stop tracking the file that no longer exists.
Wrap-up & What’s Next
There is obviously a lot more git can do and more for us to learn. To dig deeper, you will want to read up on branching strategies, pull requests, and tagging. The Git documentation is truly excellent. They have great in-depth tutorials and the book Pro Git is available for free there.
In our next post in the series, we will cover the scenario where you are part of a small team that has a remote project repository (for instance, on Github).